Why take your raster art from a traditional sketch to vector artwork?
Do you want to create art for commercial use? Even if you’re a traditional artist such as a painter or traditional illustrator, learning how to digitize art by vectorizing raster images is a skill that will make your art more marketable, and hopefully your bank account more buxom. In this post, learn how to go from sketch to vector and create digital illustrations that are ready to size for any commercial endeavor.
Even if you’re not trying to sell your artwork, learning how to go from sketch to vector can help you with your own crafts, school projects, or home decor art projects. Being able to scale a piece of art to any size you want is such a great creative asset.
In this post, I’ll share my own art process and some artistic process examples of how to vectorize both a traditional pencil drawing on paper, and a fully colorized sketch from Procreate (the digital illustration app for iPad). Unsurprisingly, this example will be cactus based. 😉 🌵
In my experience, it’s hard to attempt something like painting digital portraits straight from Adobe Illustrator – but some people are pros at this level of detail in Illustrator. There are times that I do start sketching right inside of the Illustrator program, but when I want to see that toothy gritty texture of paintbrushes and pencils, I’d rather use real paper and tools – or raster-based art programs – to keep all of that textured goodness.
Let’s do a quick overview of raster art vs vector art.
Raster vs. Vector
Both raster and vector art processes are super important for digital artists to learn, and they both offer different functionality and results. Occasionally it’s hard to decide which program to use, and sometimes you need both programs to take your artwork from sketch to vector in the best way.
Raster Images
Raster images are pixel based images – things like photographs and images created in programs like Adobe Photoshop or Procreate. Pixel-based art uses a grid to display all of the pixels that create the image. The more dense your pixels per square inch, the higher the image’s resolution (which means a higher quality image). This is why we call raster files “resolution dependent.”
In practice, a digital artist may create a raster-based file for the web, and since web resolution is 72 dpi (dots per inch), then this image will look great with 72 pixels per square inch. But for printing images like photographs and fine art, a resolution of at least 300 dpi must be achieved (300 dpi is the industry standard for commercial grade print work, but fine art may go up to 1,200 pixels per inch). The original photograph or artwork will need to be high enough resolution for print or screen display or the image will look fuzzy. And this is where we get the term “pixilated.”
It’s more difficult to edit and transform a raster-based file because you can lose quality and integrity when you start to enlarge or do effects on raster-based art. Common raster files are .JPG, .PMG, .BMP and .GIF files.
Vector Images
Vector images on the other hand, use anchor points and paths to create arcs, lines, and shapes that can be scaled as large as they will ever need to be. When drawing an image in Adobe Illustrator or other vector-based programs, you create shapes with these anchor points and paths that can then be scaled (the anchor points follow a mathematical formula) to any size.
Vector files are known as “resolution independent” files – they maintain perfect resolution always. This is why we create logos using a vector-based program. Whether the logo is used on a pen or displayed at 100 feet tall, it will maintain crisp detail and precision, no matter the size. Common vector files are .AI (Adobe Illustrator), .EPS (Post Script File) and .SVG (Scalable Vector Graphic).
Why Vectorize?
Though we all have our own digital illustration styles and processes, when creating art for commercial use, it’s a good idea to create vector files for the very reason that we’re not sure who will be using the artwork, and how large they will need it to be. When pitching your portfolio to prospective art or media buyers, producing vector files is a big plus for them – and it may be the reason they choose your collection or not.
That doesn’t mean art licensors and agents will never accept raster files, it just means that if they like your artwork and it’s vector, they can use it for anything they need to, which opens so many more doors. If the art is raster-based, they’re only able to use it on products that fit the size you created the original artwork or smaller.
Sometimes this is a creative conundrum for artists, because in a raster-based program like Photoshop or Procreate, or even traditional media like paintings or colored pencil drawings, we are able to add so much more texture and depth into the artwork.
For artist who want to create their art using traditional media or raster-based programs so that they can follow their own artistic process through, this is where we learn to take this art from sketch to vector, making it commercially viable while keeping the integrity of the original artwork.
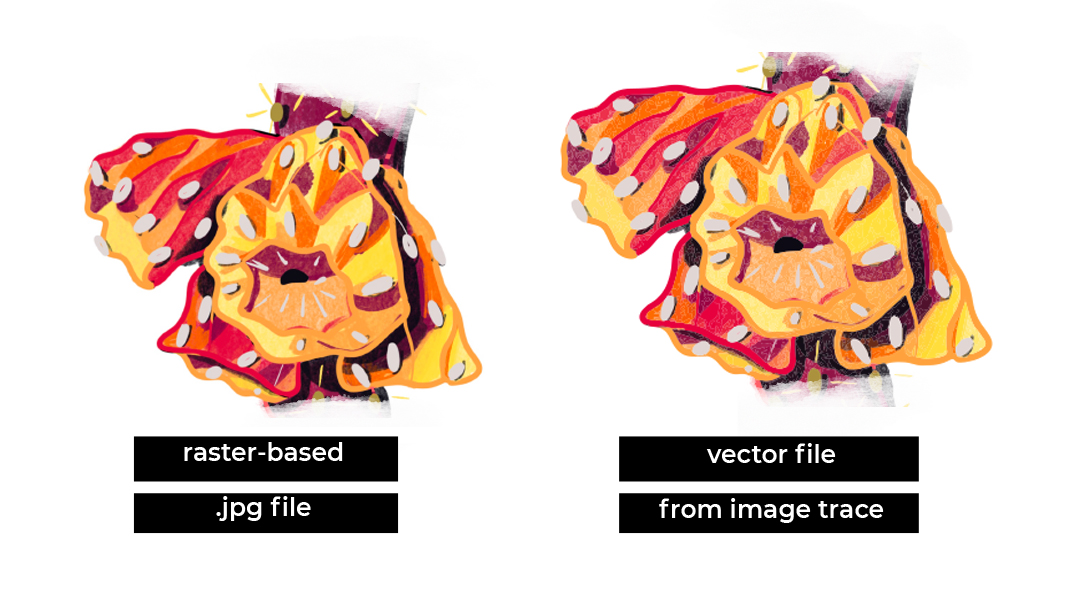
This image shows how precisely we can trace a vector image from a raster file using Adobe Illustrator. Though I chose to vectorize the entire image as one, many times I vectorize a piece of art layer by layer, This allows me more control when building objects, but for this example, having the end vector object be grouped as one object with tons of anchor points making it up is no problem. Want to dive in?
Start with Your Sketch
Below you’ll see my paper sketch version of this cholla. If you’re starting with a sketch on paper, your first step after drawing your art will be creating a digital image of your work to be vectorized. If you have a scanner, this is a great way to capture traditional art pieces. You don’t need a super fancy scanner either, most scanners will do a good job of capturing your work.
But if you don’t have a scanner (like me), you can still get a pretty great image of your work using a high resolution camera (phone cameras will work unless you’re photographing a huge fine art piece – you might want to have a professional do that). Just position yourself directly over the art piece and take the photo from above. You may have to do a little cleanup using this method, but this whole section is about how to do that, so settle in!
If your scanned image or photograph looks perfect to you and you’re ready to vectorize now, you can skip the step where we touch things up in Photoshop. But I usually find that I need to at least bump up the contrast a little bit on my pencil sketches so that the pencil lines are very dark and the paper is very light. And I like to be sure that my colors look as vibrant on screen as in real life.
Clean up the raster image in Photoshop
I always like to clean up my traditional media in Photoshop once I have photographed it.
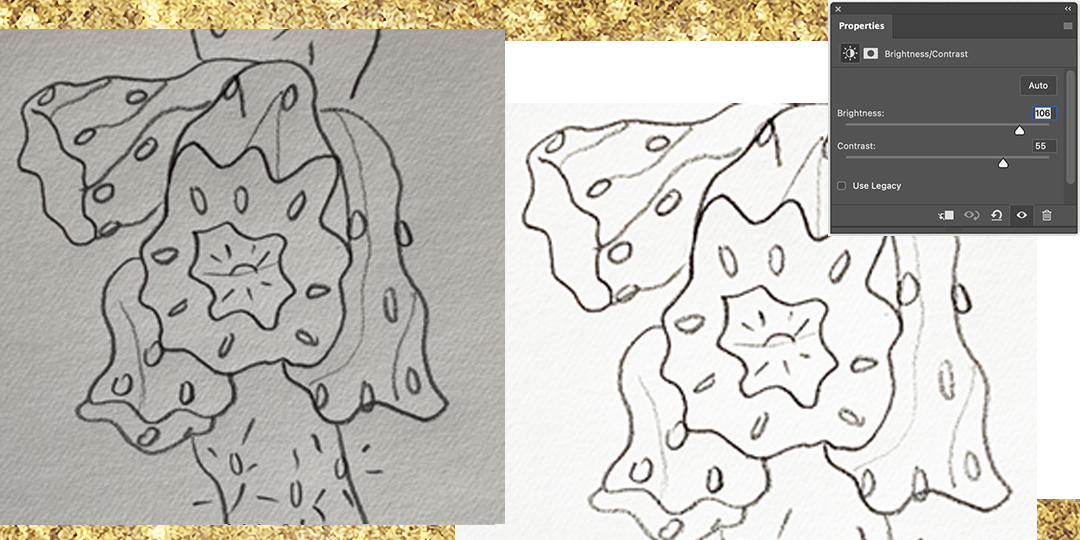
You can see from this image that the original photograph of my pencil line drawing looks really dark and gray. If I were to bring this into Illustrator to vectorize it now, all of that gray color would be added into the vector file, when what I really want is just those lines.
You can see from the image on the right, that I have chosen to go into my Adjustments/Properties palette in Photoshop and adjust the brightness and contrast. Just bringing up the brightness and contrast made a huge difference for this image. I wanted to see the background as white as possible, and the lines dark and bold.
Sometimes I duplicate that cleaned up layer and in my Layers palette where it normally says “Normal,” I select “Darken” to darken those lines. If I need to select and delete white background, this is usually when that becomes obvious. Once the lines are dark and the background is super light or white, I consider the art ready to bring into Illustrator for vectorizing.
You may need to do some different cleanup or touch up work on your art. If you are vectorizing something in full color, you may need to go into your levels to control and adjust each color, and play just a little with your Vibrance and Saturation palettes (if your photograph washed out some of the vibrance of your colors). You also may choose to clean up the edges of your lines in Photoshop using the eraser tool or different paintbrushes to smooth jagged edges.
Once you feel your artwork is ready for vectorizing, save it as a JPEG or PNG file, and get ready to move onto the next step!
Vectorizing Your Raster Sketch
Open your file in Illustrator, then go to your “Window” Menu at the top of the program, and select “Image Trace.” There are a lot of options in this palette, and based on your artwork, there will be different kinds of adjustments that will help you achieve the vectorized end result you want.
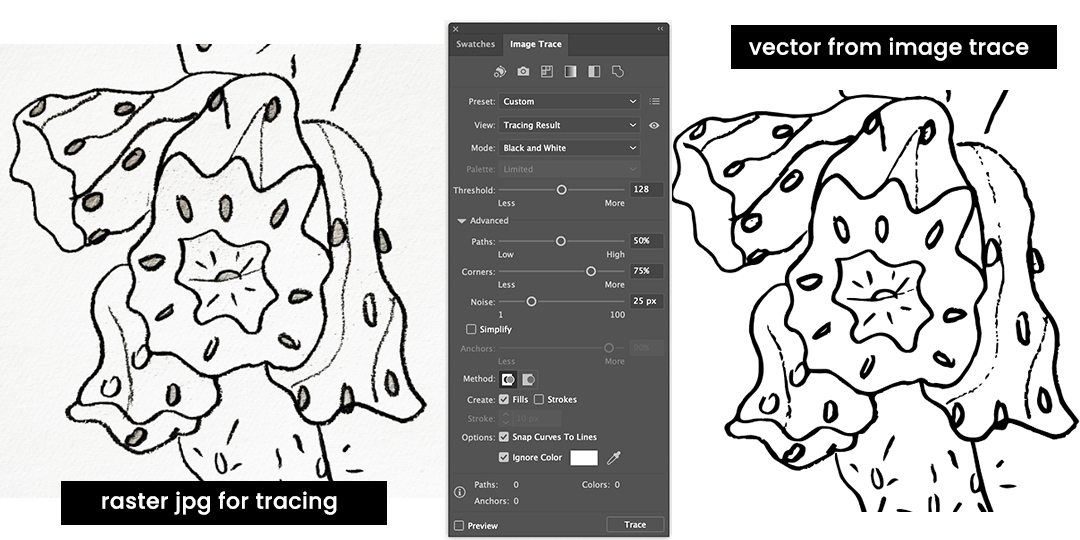
When I am vectorizing a pencil sketch, I will choose the black-and-white option and select “Ignore Color ” with the white background color selected.
If I am vectorizing full color artwork like the Procreate illustration below (I chose to go full color, using some textures and a toothy paintbrush), I’ll choose the full color option.
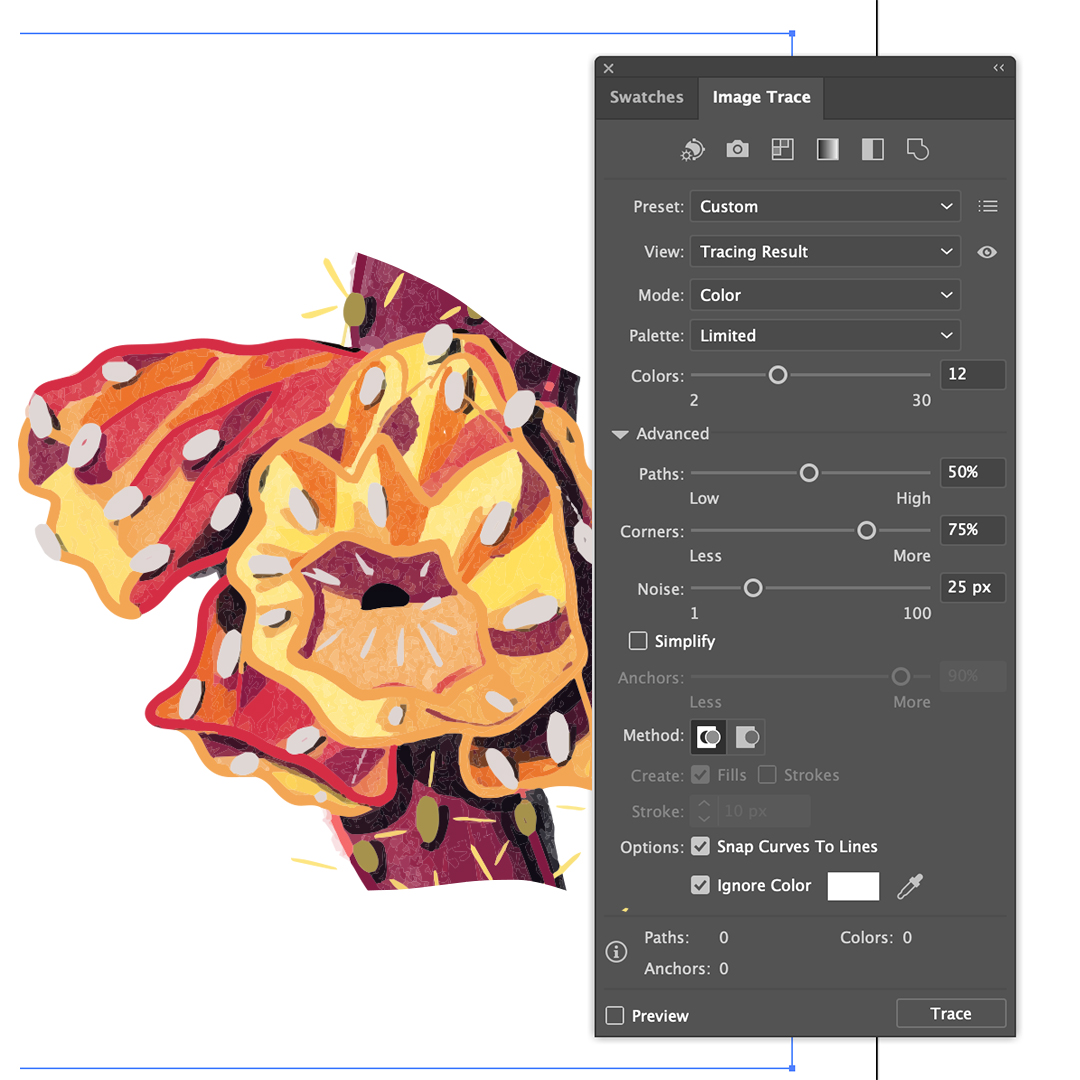
As you can see from the open Image Trace palette, there are a lot of adjustments you can make. I find that the percentages I’ve chosen for my Paths, Corners and Noise levels work for the level of detail I want to see. I also chose to constrain the end result color palette to 12 colors. This is because there is often a limited color palette constraint put on commercial pattern designs and placement art. It’s a habit that helps me to keep things clean and ready to submit.
 Once the program traces your artwork, if you’re satisfied, then there is one last step to this process to give you all of your vectors. Select your image and go to the “Object” Menu and select “Expand.” Be sure you check the “Object” and “Fill” boxes, and then OK. This will be the final step of tracing out your raster art and having fully vectorized files with all of the anchor points and paths your illustration’s heart could desire.
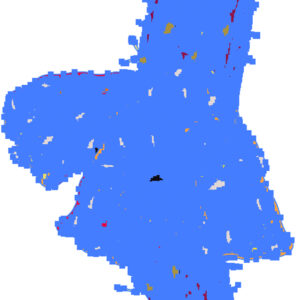
The image on the left shows just how many anchor points it took to create all of the tiny shapes that make up the texture and colors in this image. Because of all of these precisely measured little shapes, this whole image can be blown up to infinity and always look sharp.
You can now take your vector art and prepare it for commercial use in whatever way you choose – you can build vector patterns for surface pattern design pitches, you can add some text and make some placement graphic art for gift bags, mugs or product art, you can make stickers… And you can do this in any size you choose. If someone sees a sticker you made from vector artwork and they ask you if this artwork is available for a billboard – you’ll be able to say, yes!!
Creating a library of artwork ready for commercial use is a great goal for digital or traditional artists. Learning to vectorize all of your art will make you so much more prepared when opportunities come knocking. I hope this post helped you to understand how to go from sketch to vector, and I hope someday this is incredibly helpful!
Other posts you may enjoy:
Surface Patter Design Basics for Every Aspiring Pattern Designer
9 Super Cool Gifts for Graphic Designers in 2023